How to create PhoneCopy Gallery

PhoneCopy offers the ability to create galleries from photos in full resolution. You can create, edit, delete and sort these galleries, or even add more photos to the existing gallery. But most of all, you can share them with your friends, both privately by providing or sending a link, and in public by displaying them at a public address that is accessible to anyone and that can be found by search engines. It's up to you how quickly your images in the original quality reach your friends, who can instantly view them on a computer or mobile device.
If you don't already have photos and videos set up on your device, check out our guides
New gallery
The first step in creating a gallery is to tag your photos. We recommend viewing more photos per page.
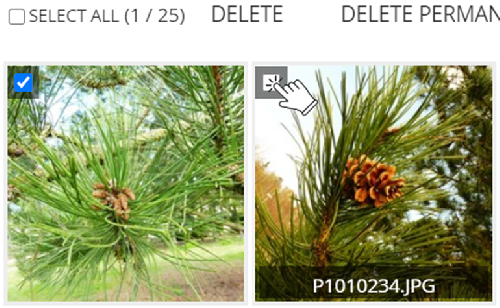
After hovering the mouse over the selected photo, a square will appear in the upper left corner. Check to add the photo to the gallery you are creating. Mark everyone else this way as well.
If you wish to select more photos at once, you can speed it up by selecting the first photo, press and hold SHIFT key, and then select the last photo. Photos between them will be selected automatically.

Once selected, click the "Share as Gallery" button.
A new page will appear where you can name your gallery. After clicking the input with the name, more options will appear: description and categories.

Gallery edit
What can you do now with the created gallery? In the list of galleries, click on the name of the gallery. In our case, there are cones. This will take you to the gallery detail.

Title and desription
You can change the name by clicking on the icon next to the title. You can rename the Gallery to "Trees", for example. You can also add a gallery description in the box above the photos.

Category
Categories should be general terms that best describe your gallery. They work like keywords, that you can use to navigate among galleries. PhoneCopy Gallery already has predefined categories. You can view them here. If you feel that an important category is missing, we would be happy if you send us a feedback. Our administrator will process your suggestions and we will add them to the category list soon.
You can add one or more categories to your gallery.

Action buttons
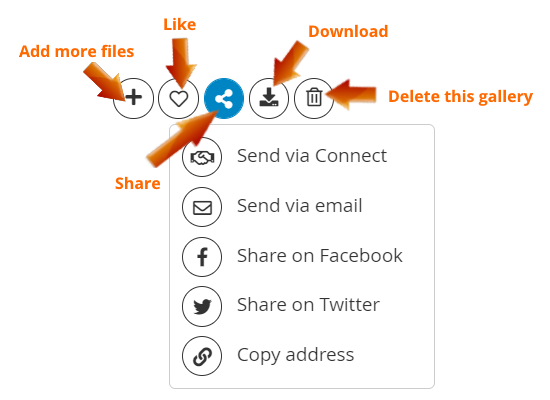
There are action buttons on the right side of the page.You can find button to open Settings (more info here)
More buttons under it:

Cover photo
If you want to select another photo to display as the cover photo, move the mouse on the photo and the icon for this setting will appear in the upper right corner
Photo
Name and description
After opening the photo detail, you have the option to add a name and description (below)
Hashtag
Hashtags are also keywords like categories, but instead to a gallery, they are connected to certain photos. You can assign information to photos e.g.:- Photo genre
- Names of objects on the photo
- More words that describe the picture
You can assign those categories to your gallery: "Travelling", "Mountains", "Skiing" or "Winter".
You can name a photo according to depicted mountain, and assign hashtags like "show", "mountain", "Alps", etc.
Additional options for photos
It is possible to download original resolution of photos (if it is enabled in gallery permissions), share photos and of course it is possible to give a like to your as well as other users photos.Photo deletion
If you decide that you no longer want some photo in the gallery, just hover your mouse over it and an icon for deletion will appear in the upper left corner. After clicking, the photo will be removed from the gallery. Of course, it will remain in the media and you can add it again at any time.
Add more photos
You can add another photo to the created gallery at any time. Just either
a) click the icon "+" in detail. Mark new photos you want to add, then click "Add to Gallery"
or
b) In the media, first select the photos, click the "Add to Gallery" button, and then choose from the list which gallery you want to add the photos to.

Gallery sharing
The created gallery is automatically private. When you change the status, you will get a link that can be shared between friends, and even also on Facebook or Twitter. You can also publish your galleries to the public.
You can create a link either directly in the gallery list or in the gallery detail by clicking the "Share" button. The settings page appears..
Gallery publishing
The PhoneCopy gallery allows you to choose from three states:
- Private: Your gallery is visible only by you
- Non-public: Anyone who will get your link can view your gallery
- Public: Gallery browsing is unrestricted and anyone can look at it. The gallery is also published on our PhoneCopy Galleries, where it can be viewed and shared by public.
When you change your status to private or public, you'll see additional setting options. The icon on the left allows you to quickly copy the link. You can also email the link directly.
Access rights
You can password protect your gallery and choose whether to allow downloading of photos located in this gallery.

